Billboards
In a previous article we used a CanvasTexture
to make labels / badges on characters. Sometimes we'd like to make labels or
other things that always face the camera. Three.js provides the Sprite and
SpriteMaterial to make this happen.
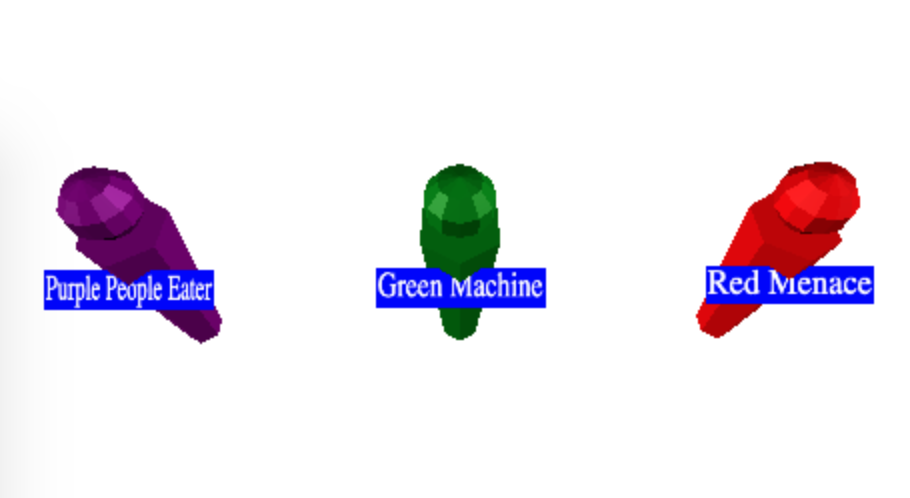
Let's change the badge example from the article on canvas textures
to use Sprite and SpriteMaterial
function makePerson(x, labelWidth, size, name, color) {
  const canvas = makeLabelCanvas(labelWidth, size, name);
  const texture = new THREE.CanvasTexture(canvas);
  // because our canvas is likely not a power of 2
  // in both dimensions set the filtering appropriately.
  texture.minFilter = THREE.LinearFilter;
  texture.wrapS = THREE.ClampToEdgeWrapping;
  texture.wrapT = THREE.ClampToEdgeWrapping;

-  const labelMaterial = new THREE.MeshBasicMaterial({
+  const labelMaterial = new THREE.SpriteMaterial({
    map: texture,
-    side: THREE.DoubleSide,
    transparent: true,
  });

  const root = new THREE.Object3D();
  root.position.x = x;

  const body = new THREE.Mesh(bodyGeometry, bodyMaterial);
  root.add(body);
  body.position.y = bodyHeight / 2;

  const head = new THREE.Mesh(headGeometry, bodyMaterial);
  root.add(head);
  head.position.y = bodyHeight + headRadius * 1.1;

-  const label = new THREE.Mesh(labelGeometry, labelMaterial);
+  const label = new THREE.Sprite(labelMaterial);
  root.add(label);
  label.position.y = bodyHeight * 4 / 5;
  label.position.z = bodyRadiusTop * 1.01;
and the labels now always face the camera
One problem is from certain angles the labels now intersect the characters.
We can move the position of the labels to fix.
+// if units are meters then 0.01 here makes size
+// of the label into centimeters.
+const labelBaseScale = 0.01;
const label = new THREE.Sprite(labelMaterial);
root.add(label);
-label.position.y = bodyHeight * 4 / 5;
-label.position.z = bodyRadiusTop * 1.01;
+label.position.y = head.position.y + headRadius + size * labelBaseScale;

-// if units are meters then 0.01 here makes size
-// of the label into centimeters.
-const labelBaseScale = 0.01;
label.scale.x = canvas.width  * labelBaseScale;
label.scale.y = canvas.height * labelBaseScale;
Another thing we can do with billboards is draw facades.
Instead of drawing 3D objects we draw 2D planes with an image of 3D objects. This is often faster than drawing 3D objects.
For example let's make a scene with grid of trees. We'll make each tree from a cylinder for the base and a cone for the top.
First we make the cone and cylinder geometry and materials that all the trees will share
const trunkRadius = .2;
const trunkHeight = 1;
const trunkRadialSegments = 12;
const trunkGeometry = new THREE.CylinderGeometry(
    trunkRadius, trunkRadius, trunkHeight, trunkRadialSegments);

const topRadius = trunkRadius * 4;
const topHeight = trunkHeight * 2;
const topSegments = 12;
const topGeometry = new THREE.ConeGeometry(
    topRadius, topHeight, topSegments);

const trunkMaterial = new THREE.MeshPhongMaterial({color: 'brown'});
const topMaterial = new THREE.MeshPhongMaterial({color: 'green'});
Then we'll make a function that makes a Mesh each for the trunk and top
of a tree and parents both to an Object3D.
function makeTree(x, z) {
  const root = new THREE.Object3D();
  const trunk = new THREE.Mesh(trunkGeometry, trunkMaterial);
  trunk.position.y = trunkHeight / 2;
  root.add(trunk);

  const top = new THREE.Mesh(topGeometry, topMaterial);
  top.position.y = trunkHeight + topHeight / 2;
  root.add(top);

  root.position.set(x, 0, z);
  scene.add(root);

  return root;
}
Then we'll make a loop to place a grid of trees.
for (let z = -50; z <= 50; z += 10) {
  for (let x = -50; x <= 50; x += 10) {
    makeTree(x, z);
  }
}
Let's also add a ground plane while we're at it
// add ground
{
  const size = 400;
  const geometry = new THREE.PlaneGeometry(size, size);
  const material = new THREE.MeshPhongMaterial({color: 'gray'});
  const mesh = new THREE.Mesh(geometry, material);
  mesh.rotation.x = Math.PI * -0.5;
  scene.add(mesh);
}
and change the background to light blue
const scene = new THREE.Scene();
-scene.background = new THREE.Color('white');
+scene.background = new THREE.Color('lightblue');
and we get a grid of trees
There are 11x11 or 121 trees. Each tree is made from a 12 polygon cone and a 48 polygon trunk so each tree is 60 polygons. 121 * 60 is 7260 polygons. That's not that many but of course a more detailed 3D tree might be 1000-3000 polygons. If they were 3000 polygons each then 121 trees would be 363000 polygons to draw.
Using facades we can bring that number down.
We could manually create a facade in some painting program but let's write some code to try to generate one.
Let's write some code to render an object to a texture
using a RenderTarget. We covered rendering to a RenderTarget
in the article on render targets.
function frameArea(sizeToFitOnScreen, boxSize, boxCenter, camera) {
  const halfSizeToFitOnScreen = sizeToFitOnScreen * 0.5;
  const halfFovY = THREE.MathUtils.degToRad(camera.fov * .5);
  const distance = halfSizeToFitOnScreen / Math.tan(halfFovY);

  camera.position.copy(boxCenter);
  camera.position.z += distance;

  // pick some near and far values for the frustum that
  // will contain the box.
  camera.near = boxSize / 100;
  camera.far = boxSize * 100;

  camera.updateProjectionMatrix();
}

function makeSpriteTexture(textureSize, obj) {
  const rt = new THREE.WebGLRenderTarget(textureSize, textureSize);

  const aspect = 1;  // because the render target is square
  const camera = new THREE.PerspectiveCamera(fov, aspect, near, far);

  scene.add(obj);

  // compute the box that contains obj
  const box = new THREE.Box3().setFromObject(obj);

  const boxSize = box.getSize(new THREE.Vector3());
  const boxCenter = box.getCenter(new THREE.Vector3());

  // set the camera to frame the box
  const fudge = 1.1;
  const size = Math.max(...boxSize.toArray()) * fudge;
  frameArea(size, size, boxCenter, camera);

  renderer.autoClear = false;
  renderer.setRenderTarget(rt);
  renderer.render(scene, camera);
  renderer.setRenderTarget(null);
  renderer.autoClear = true;

  scene.remove(obj);

  return {
    position: boxCenter.multiplyScalar(fudge),
    scale: size,
    texture: rt.texture,
  };
}
Some things to note about the code above:
We're using the field of view (fov) defined above this code.
We're computing a box that contains the tree the same way we did in the article on loading a .obj file with a few minor changes.
We call frameArea again adapted the article on loading a .obj file.
In this case we compute how far the camera needs to be away from the object
given its field of view to contain the object. We then position the camera -z that distance
from the center of the box that contains the object.
We multiply the size we want to fit by 1.1 (fudge) to make sure the tree fits
completely in the render target. The issue here is the size we're using to
calculate if the object fits in the camera's view is not taking into account
that the very edges of the object will end up dipping outside area we
calculated. We could compute how to make 100% of the box fit but that would
waste space as well so instead we just fudge it.
Then we render to the render target and remove the object from the scene.
It's important to note we need the lights in the scene but we need to make sure nothing else is in the scene.
We also need to not set a background color on the scene
const scene = new THREE.Scene();
-scene.background = new THREE.Color('lightblue');
Finally we've made the texture we return it and the position and scale we need to make the facade so that it will appear to be in the same place.
We then make a tree and call this code and pass it in
// make billboard texture
const tree = makeTree(0, 0);
const facadeSize = 64;
const treeSpriteInfo = makeSpriteTexture(facadeSize, tree);
We can then make a grid of facades instead of a grid of tree models
+function makeSprite(spriteInfo, x, z) {
+  const {texture, offset, scale} = spriteInfo;
+  const mat = new THREE.SpriteMaterial({
+    map: texture,
+    transparent: true,
+  });
+  const sprite = new THREE.Sprite(mat);
+  scene.add(sprite);
+  sprite.position.set(
+      offset.x + x,
+      offset.y,
+      offset.z + z);
+  sprite.scale.set(scale, scale, scale);
+}

for (let z = -50; z <= 50; z += 10) {
  for (let x = -50; x <= 50; x += 10) {
-    makeTree(x, z);
+    makeSprite(treeSpriteInfo, x, z);
  }
}
In the code above we apply the offset and scale needed to position the facade so it appears the same place the original tree would have appeared.
Now that we're done making the tree facade texture we can set the background again
scene.background = new THREE.Color('lightblue');
and now we get a scene of tree facades
Compare to the trees models above and you can see it looks fairly similar. We used a low-res texture, just 64x64 pixels so the facades are blocky. You could increase the resolution. Often facades are used only in the far distance when they are fairly small so a low-res texture is enough and it saves on drawing detailed trees that are only a few pixels big when far away.
Another issue is we are only viewing the tree from one side. This is often solved by rendering more facades, say from 8 directions around the object and then setting which facade to show based on which direction the camera is looking at the facade.
Whether or not you use facades is up to you but hopefully this article gave you some ideas and suggested some solutions if you decide to use them.